Showing posts with label paintwork. Show all posts

Friday 2 August 2013

No holidays for kitchen maids

Those old style wooden pegs are well suited for fastening all sorts of half full food sacks. I thought it to be more fun if they looked like real kitchen staff.

Peg doll kitchen maids {tettidesign}


After a short training period, I'm sure, I will not be needed in the kitchen at all. The three girls can work out a schedule among themselves, and each gets to be in charge of one meal a day.

Peg doll kitchen maids {tettidesign}


And they always work with a smile.

Peg doll kitchen maids {tettidesign}


These other type of clothespins come handy, too, to snap smaller bags and packages.

Painted clothespins {tettidesign}


Blue and white clothespins {tettidesign}


Wednesday 20 June 2012

Rosy times ahead

There can never be too many small vessels at home for this and that, especially in the craft room. After taking a look at the expanding tin and napkin pile, it was quite clear, what sort of experiment should be carried out. (And there was a big sale at haberdashery). So these rosy lacy cans were born.

Recycled tin cans

The tins were painted first, then roses cut from napkins positioned and moistened with water using a brush, and then three layers of mod podge applied. Finally, the cans were trimmed with lace and twine to protect against sharp tin edges.

Upcycled tin cans with roses


Decoupage roses on tin cans


Saturday 11 February 2012

Shades of grey

When there are many small things to keep organised, there is a need for many small drawers! Those antique cabinets with lots of drawers are just perfect, but really hard to find. Now I discovered a line of these small drawer cabinets in a local hardware store, adopted one at once and dressed it in shades of grey.

French country style cabinet


Only a few days ago this was just an unfinished birch wood cabinet manufactured by Zeller Present.

Unfinished cabinet drawers


After dusting and wiping, a coat of dark grey paint was applied. That was a mix of beige and blue interior paint leftovers with some black acrylic art paint added to make it darker.

Painted cabinet drawers


The next treatment was painting the exterior surfaces intentionally unevenly with lighter shades of grey and beige using both brush and sponge for a distressed look.

Shabby cabinet drawersShabby painted cabinet drawers


Last but not least - some stampings with rubber stamp and that darker grey paint again.

Shabby stamped cabinet drawersCabinet drawers


Further decorations and varnishing I had had in mind, seemed redundant now. The surface was really nicely and chalkpaintly matte, so this piece was declared finished. Poor thing looks so much older now.


Saturday 28 January 2012

Wool spooling

Another great find from the attic department: antique wooden wool spools. These look so cozy on the shelves and are perfect for storaging cords and ribbons or a single yarn ball. Not yet tested, but it must be very convenient to wind yarn from the spool during knitting. Only a spool holder missing now.

Antique wool spools


The spools went through a thorough cleaning, nevertheless kept the terrible 'attic' smell and had to be coated with furniture varnish. This is why they are a bit shiny, but the antiqueness is still quite visible.

Antique wool spools


Wednesday 23 March 2011

Wire mailbox

This is a shabby style mailbox to hang by the door, where anything that arrived by post or anything that needs to be taken to the post office can be temporarily stored. Sort of a 2-in-1 incoming-outgoing box.
Made this out of wire in three different gauges using the design-as-you-go working style without a plan. The uneven paint cover makes it look really old and that is the key.


Tuesday 18 May 2010

Meet Mannie

Mannie came to me feeling somewhat tired and neglected. She was really happy to hear that I was looking for an assistant and eager to start working right away.

Dressform wearing a crochet scarf

Mannie is my only helper at the moment, doing fitting and modelling, and hopefully will help out with some bookkeeping and supplies shopping as well in the future. (Haven't told her that yet, letting her enjoy the summer first.)

Mannie before and after the makeover:

Dress form before and after pictures


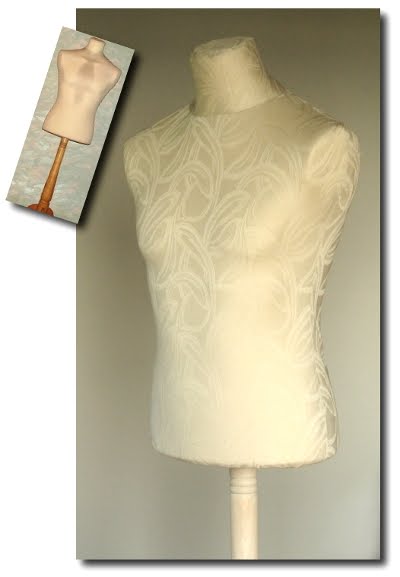
First thing, of course, was to make Mannie a new proper outfit.
I needed to find a fabric that was stretchy, textured and of beautiful cream or beige colour. Not an easy task at all, but... accomplished - after going through ALL the fabric stores in the city in two days.
This fabric is probably a mixture of cotton and synthetics and not so stretchy as Mannie's old dress, so I had to make a cut in the back and add a zipper.

Dressform's cut out fabric and zipper


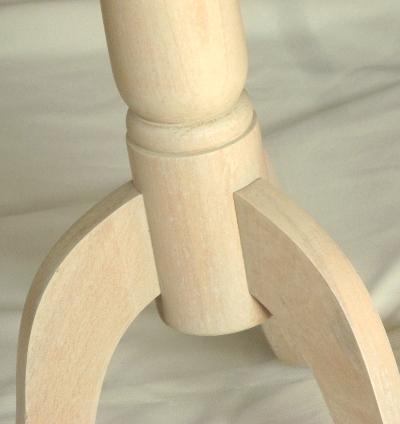
To give a matching finishing to Mannie's wooden leg, I painted it with water diluted wall paint in three coats. The outcome was really surprising, looking as if the wood had been sandpapered and lime painted and all...

Painted dressform leg