

Thursday 23 December 2010
Christmas knocking on the door
Last post of the year - the holidays and the end of the year will mostly be spent offline. Time to enjoy snow, candle light, presents, cooking, reading and being a bit lazy. And making plans for the new year. Hope you can do that all, too. Nothing else to say then but Merry Christmas!
Sunday 12 December 2010
Felted decorations
Something small and woollen will bring home that country style cosiness, when there is snow outside and a lighted fireplace inside. That is the mood I was looking for with these needle-felted hanging decorations:

Sunday 5 December 2010
Confitería gift bag pattern
Sometimes it is not about what you give as a gift, but the good thoughts and wishes behind it and how it's presented. Lots of warmth can be added by making the gift wrap with your own hands, therefore I designed a small pouch to knit just before Christmas.
With sport weight yarn the bag will be approximately 8 cm or 3 inches in diameter. And you can easily turn the pouch into a bottle cozy by knitting it taller.
Für deutsche Anleitung bitte runter scrollen!


The pdf-version of the pattern in both languages is available as a Ravelry download. Feel free to post a link of your finished work in the comments or send me a photo. All comments and questions are welcome.
Strickanleitung für Geschenkbeutel
Manchmal ist es nicht so wichtig, was man schenkt, aber wie es gemacht wird und natürlich die gute Wünsche und Gedanken dahinten. Es gibt noch genügend Zeit bis Weihnachten, um diesen kleinen Geschenkbeutel zu stricken und mit selbstgemachter Verpackung noch mehr Herzlichkeit schenken.
Mit dünnerem Garn oder Sockenwolle gestrickt wird der Beutel mit einem Durchmesser von etwa 8 cm. Und höher gestrickt bekommt man eine tolle Flaschenhülle.

Ich würde gerne nach dieser Anleitung gestrickte Beutelchen hier vorstellen, ihr könnt ein Link zu eurem Blog als Kommentar posten oder Fotos per E-Mail schicken. Alle Fragen und Kommentare sind auch willkommen.
With sport weight yarn the bag will be approximately 8 cm or 3 inches in diameter. And you can easily turn the pouch into a bottle cozy by knitting it taller.
Für deutsche Anleitung bitte runter scrollen!

Material:
• Yarn approximately 20 g/0.7 oz, tension 22-26 st per 10 cm/4 in
(cotton works best, wool might be too soft to stay in shape)
• Double pointed needles 3 mm/US 2½
• Ribbon
*...* – repeat the pattern between asterisks
A
Cast on 48 stitches.
Rd 1, 3 Purl all stitches
Rd 2 Knit all stitches
B
Rd 4 *k1, yo, k2, sl2 knitwise, k1, p2sso, k2, yo*
Rd 5, 7, 9 Knit all stitches
Rd 6 *k2, yo, k1, sl2 knitwise, k1, p2sso, k1, yo, k1*
Rd 8 *k3, yo, sl2 knitwise, k1, p2sso, yo, k2*
C
Rd 10 *k4, yo, k1, k2tog, k1*
Rd 11, 13, 14, 15 Knit all stitches
Rd 12 *k1, sl1, k1, psso, k1, yo, k1, yo, k1, k2tog*
Repeat rounds 10-15 six times or until desired height of the bag.
D
Rd 16 *k3, sl2 knitwise, k1, p2sso, k2*
Rd 17 *p3, k1, p2*
Rd 18 Knit all stitches
Work rounds 17 and 18 alternatively for seven rounds.
Rd 19 *k2, sl2 knitwise, k1, p2sso, k1*
Rd 20, 22 *p2, k1, p1*
Rd 21 Knit all stitches
Rd 23 *k1, sl2 knitwise, k1, p2sso*
Rd 24 *p1, k1*
Rd 25 *k2tog*
Pull the yarn through the remaining stitches, fasten and weave in the ends. Wash and block on a jar, if necessary. Add a ribbon through the holes of round 8.
The knitting chart:

Notes:
Found a great video tutorial on the double decrease or sl2 knitwise, k1, p2sso used in this pattern.
The pdf-version of the pattern in both languages is available as a Ravelry download. Feel free to post a link of your finished work in the comments or send me a photo. All comments and questions are welcome.
* * *
Strickanleitung für Geschenkbeutel
Manchmal ist es nicht so wichtig, was man schenkt, aber wie es gemacht wird und natürlich die gute Wünsche und Gedanken dahinten. Es gibt noch genügend Zeit bis Weihnachten, um diesen kleinen Geschenkbeutel zu stricken und mit selbstgemachter Verpackung noch mehr Herzlichkeit schenken.
Mit dünnerem Garn oder Sockenwolle gestrickt wird der Beutel mit einem Durchmesser von etwa 8 cm. Und höher gestrickt bekommt man eine tolle Flaschenhülle.

Material:
• Dünneres Garn etwa 20 g (Maschenprobe 22-26 M/10 cm)
• Nadelspiel 3 mm
• Satinband
Strickschrift: siehe oben
*...* – wiederholen
A
48 M anschlagen.
Rd 1, 3 Alle Maschen links str
Rd 2 Alle Maschen rechts str
B
Rd 4 *1 M re, 1 U, 2 M re, 2 M re abheben, 1 M re, 2 abgehob M darüber ziehen, 2 M re, 1 U*
Rd 5, 7, 9 Alle Maschen rechts str
Rd 6 *2 M re, 1 U, 1 M re, 2 M re abheben, 1 M re, 2 abgehob M darüber ziehen, 1 M re, 1 U, 1 M re*
Rd 8 *3 M re, 1 U, 2 M re abheben, 1 M re, 2 abgehob M darüber ziehen, 1 U, 2 M re*
C
Rd 10 *4 M re, 1 U, 1 M re, 2 M re zus str, 1 M re*
Rd 11, 13, 14, 15 Alle Maschen rechts str
Rd 12 *1 M re, 2 M re überzog zus str, 1 M re, 1 U, 1 M re, 1 U, 1 M re, 2 M re zus str *
Runden 10 bis 15 sechs Mal oder bis auf gewünschte Höhe wiederholen.
D
Rd 16 *3 M re, 2 M re abheben, 1 M re, 2 abgehob M darüber ziehen, 2 M re*
Rd 17 *3 M li, 1 M re, 2 M li*
Rd 18 Alle Maschen rechts str
Runden 17 und 18 wechselnd über sieben Runden wiederholen.
Rd 19 *2 M re, 2 M re abheben, 1 M re, 2 abgehob M darüber ziehen, 1 M re*
Rd 20, 22 *2 M li, 1 M re, 1 M li*
Rd 21 Alle Maschen rechts str
Rd 23 *1 M re, 2 M re abheben, 1 M re, 2 abgehob M darüber ziehen*
Rd 24 *1 M li, 1 M re*
Rd 25 *2 M re zus str*
Die restlichen Maschen mit dem Endfaden zusammenziehen, beide Endfaden nach innen gut verknoten und in die Arbeit vernähen. Ein Satinband durch die Umschlag-Löcher der Runde 8 ziehen.
Ich würde gerne nach dieser Anleitung gestrickte Beutelchen hier vorstellen, ihr könnt ein Link zu eurem Blog als Kommentar posten oder Fotos per E-Mail schicken. Alle Fragen und Kommentare sind auch willkommen.
Saturday 27 November 2010
Black nights
Those dark November nights have inspired some works in black with some sparkle.
Knitted and felted hand warmers, fading from black to grey, made of Aade Artistic, embellished with large crochet flowers and small glass beads:

A long black rosary style necklace with heart, rose and moon, and bronze coloured additions:

And a necklace to add some starshine and golden spark to the black nights:

For now, it has been snowing almost continuously for some days and the nights are not completely dark - thanks to the 30 cm thick snow cover.
Knitted and felted hand warmers, fading from black to grey, made of Aade Artistic, embellished with large crochet flowers and small glass beads:
A long black rosary style necklace with heart, rose and moon, and bronze coloured additions:
And a necklace to add some starshine and golden spark to the black nights:
For now, it has been snowing almost continuously for some days and the nights are not completely dark - thanks to the 30 cm thick snow cover.
Thursday 11 November 2010
Murphy's laws on knitting
Surely every crafter has felt that the validity of Murphy's laws will eventually become evident in the craft making process as well as in any other area of life. Here are some knitting related laws, which I most often experience:
- You have found a great position in your comfy knitting chair, taken the needles, started to cast on and planning not to move yourself for the next hour or two – only to discover that the fresh cup of coffee was left in the kitchen downstairs...
- As soon as you cut off the cast-on yarn tail that keeps messing with your knitwork, the work is doomed.
- Yarn runs out when 99 per cent of the work is completed.
- The yarn needed to finish a work is sold out in all the yarn stores within a reasonable distance, globally in online shops and its production discontinued.
- The more time you have spent on a knitting work, the more closer to the end you will realise that something went wrong at the beginning.
- The weather is fine and sunny, when a long knitting day indoors awaits, and turns dark and rainy, as soon as the work is finished and you want to take photos of it.
- If knitting work seems to go well, you have obviously miscounted the stitches.
- All horizontal surfaces shall be filled with unfinished knitworks.
- Every project takes longer than you think.
Monday 25 October 2010
Cool Current wristwarmers pattern
Keep your hands warm with these wristwarmers like flowing currents when taking a stroll by the water. Or make a holiday gift – today is a good day to start. The cuffs or wristwarmers are an easy one skein project for softer yarns. My sample is knitted with pure alpaca wool Indiecita by Filcolana, colour 228.
Für deutsche Anleitung bitte runter scrollen!


I would love to show off your finished work, so feel free to post a link in the comments or send me a photo. All comments and questions are mostly appreciated, my e-mail address can be found on my profile. Thank you for taking the time to try it out!
Strickanleitung für Armstulpen
Ob für einen Spaziergang entlang des Ufers oder als Weihnachtsgeschenk vorgesehen – heute ist ein guter Tag mit diesen „fließenden“ Armstulpen anzufangen. Die Stulpen sind ziemlich einfach zu stricken und dafür braucht man nur ein Knäuel. Ich habe reine Alpakawolle, das Indiecita von Filcolana, Farbe 228 verwendet.

Ich würde gerne nach dieser Anleitung gestrickte Stulpen hier vorstellen, ihr könnt ein Link zu eurem Blog als Kommentar posten oder Fotos mir per E-Mail schicken. Alle Fragen und Kommentare sind auch willkommen, meine E-Mail-Adresse ist in meinem Profil zu finden. Danke, daß ihr eure Zeit mit dieser Strickanleitung verbracht habt!
Für deutsche Anleitung bitte runter scrollen!

Materials:
• Fingering weight yarn approximately 50 g/1.7 oz, 160 m/176 yds, gauge 26-30 stitches per 10 cm/4 in
• Double pointed needles 3 mm/US 2½
• Cable needle
• Stitch marker
Here is the knitting chart followed by written instructions:

*...* – repeat the pattern between asterisks
skp – slip 1, knit 1, pass slipped stitch over
c3f – cable 3 front
A
Cast on 56 stitches, divide sts onto 3 or 4 needles and join to work in the round. Place marker to indicate the beginning of round.
Rd 1 *k4, p4*
Rd 2 *k2, skp, k1, k2tog, yo, k1, yo*
Rd 3 knit all stitches
Repeat rounds 2 and 3 until work measures 31 rounds or 7 cm/3 in.
C
Rd 32 *slip next 3 stitches to a cable needle in front of work, k3, k3 from the cable needle, k2tog, yo*
Rd 33 *p3, k5*
Rd 34 *p3, k3, k2tog, yo*
Rd 35 *p3, k5*
Repeat rounds 34 and 35 until desired length.
Cast off all stitches (*p3, k5*). Bind off yarn and weave in the ends.
Knit the other wristwarmer the same way.
Notes:
• When using other gauges, increase or decrease the stitch count, keeping it a multiple of 8
• If not sure how long wristwarmers your yarn will be enough for, weigh the skein every now and then while knitting the first one and cast off when half of the skein is knitted
• Help for knitting abbreviations can be found in lots of places, e.g. Knittingfool, KnittingHelp, Vogue Knitting
• Fingering weight yarn approximately 50 g/1.7 oz, 160 m/176 yds, gauge 26-30 stitches per 10 cm/4 in
• Double pointed needles 3 mm/US 2½
• Cable needle
• Stitch marker
Here is the knitting chart followed by written instructions:

*...* – repeat the pattern between asterisks
skp – slip 1, knit 1, pass slipped stitch over
c3f – cable 3 front
A
Cast on 56 stitches, divide sts onto 3 or 4 needles and join to work in the round. Place marker to indicate the beginning of round.
Rd 1 *k4, p4*
Not too convenient to handle the first rounds on double pointed needles, but it gets easier round by round. If the yarn is very slippery, use bamboo or wooden needles.
BRd 2 *k2, skp, k1, k2tog, yo, k1, yo*
Rd 3 knit all stitches
Repeat rounds 2 and 3 until work measures 31 rounds or 7 cm/3 in.
C
Rd 32 *slip next 3 stitches to a cable needle in front of work, k3, k3 from the cable needle, k2tog, yo*
Rd 33 *p3, k5*
That was the most difficult part, from now on it goes much faster towards the end.
DRd 34 *p3, k3, k2tog, yo*
Rd 35 *p3, k5*
Repeat rounds 34 and 35 until desired length.
Cast off all stitches (*p3, k5*). Bind off yarn and weave in the ends.
Knit the other wristwarmer the same way.
All done now – time to admire your work!
Notes:
• When using other gauges, increase or decrease the stitch count, keeping it a multiple of 8
• If not sure how long wristwarmers your yarn will be enough for, weigh the skein every now and then while knitting the first one and cast off when half of the skein is knitted
• Help for knitting abbreviations can be found in lots of places, e.g. Knittingfool, KnittingHelp, Vogue Knitting
I would love to show off your finished work, so feel free to post a link in the comments or send me a photo. All comments and questions are mostly appreciated, my e-mail address can be found on my profile. Thank you for taking the time to try it out!
* * *
Strickanleitung für Armstulpen
Ob für einen Spaziergang entlang des Ufers oder als Weihnachtsgeschenk vorgesehen – heute ist ein guter Tag mit diesen „fließenden“ Armstulpen anzufangen. Die Stulpen sind ziemlich einfach zu stricken und dafür braucht man nur ein Knäuel. Ich habe reine Alpakawolle, das Indiecita von Filcolana, Farbe 228 verwendet.

Material:
• Dünneres Garn etwa 50 g/160 m (Maschenprobe 26-30 M/10 cm)
• Nadelspiel 3 mm
• Zopf- oder Hilfsnadel
Strickschrift:

*...* – wiederholen
A
56 M anschlagen.
Rd 1 *4 M re, 4 M li*
B
Rd 2 *2 M re, 2 M re überzogen zus str, 1 M re, 2 M re zus str, 1 U, 1 M re, 1 U*
Rd 3 Alle Maschen rechts str
Runden 2 und 3 wiederholen, bis die Arbeit 7 cm oder 31 Runden hoch ist.
C
Rd 32 *3 M vor die Arbeit legen, 3 M re, 3 M der Hilfsnadel re str, 2 M re zus str, 1 U*
Rd 33 *3 M li, 5 M re*
D
Rd 34 *3 M li, 3 M re, 2 M re zus str, 1 U*
Rd 35 *3 M li, 5 M re*
Runden 34 und 35 bis auf gewünschte Länge wiederholen.
Alle Maschen abketten (*3 M li, 5 M re*), Garn abschneiden und in die Arbeit verstecken.
Die andere Stulpe genauso stricken und fertig!
Ich würde gerne nach dieser Anleitung gestrickte Stulpen hier vorstellen, ihr könnt ein Link zu eurem Blog als Kommentar posten oder Fotos mir per E-Mail schicken. Alle Fragen und Kommentare sind auch willkommen, meine E-Mail-Adresse ist in meinem Profil zu finden. Danke, daß ihr eure Zeit mit dieser Strickanleitung verbracht habt!
Thursday 14 October 2010
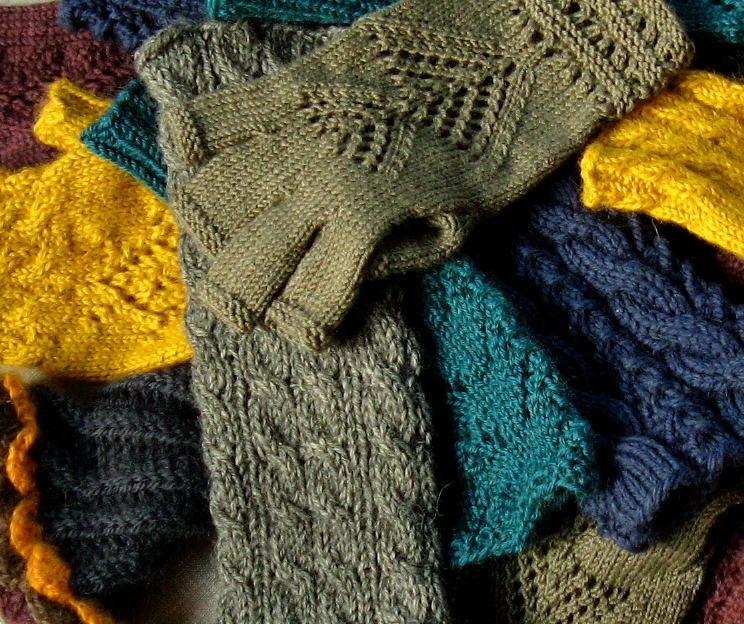
Falling leaves and gloves
Like colourful autumn leaves fallen to the ground, my table was today covered with gloves, hand and leg warmers in different shapes and colours. Not quite the same as the leaves, but just the hues I like at the moment.
Something seems to be missing - I know, brown! Back to work it means... to the impressive sound of a hail storm behind the window.
Something seems to be missing - I know, brown! Back to work it means... to the impressive sound of a hail storm behind the window.
Wednesday 29 September 2010
Eager knitter
A crafty spider has been living behind my window for several weeks now. This hard-working creature has knitted some amazing lace and keeps repairing her knitwork on a daily basis. The lovely textile also served well as a protective mosquito net with open windows during summertime.
Just thinking, would the spider learn to use new patterns, if I'd (completely unintentionally, of course) forgot a stitch pattern book on the window sill...
I have read about tests, where caffeine was given to spiders and that totally messed up their webs. Strangely, with me it's just the opposite.

Just thinking, would the spider learn to use new patterns, if I'd (completely unintentionally, of course) forgot a stitch pattern book on the window sill...
I have read about tests, where caffeine was given to spiders and that totally messed up their webs. Strangely, with me it's just the opposite.
Tuesday 21 September 2010
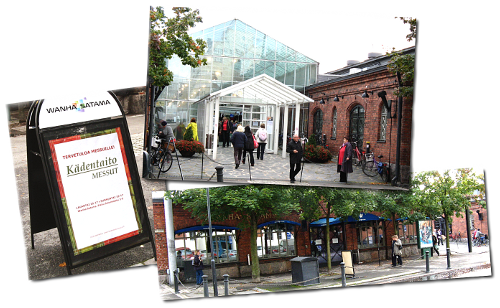
Craft fair in Helsinki
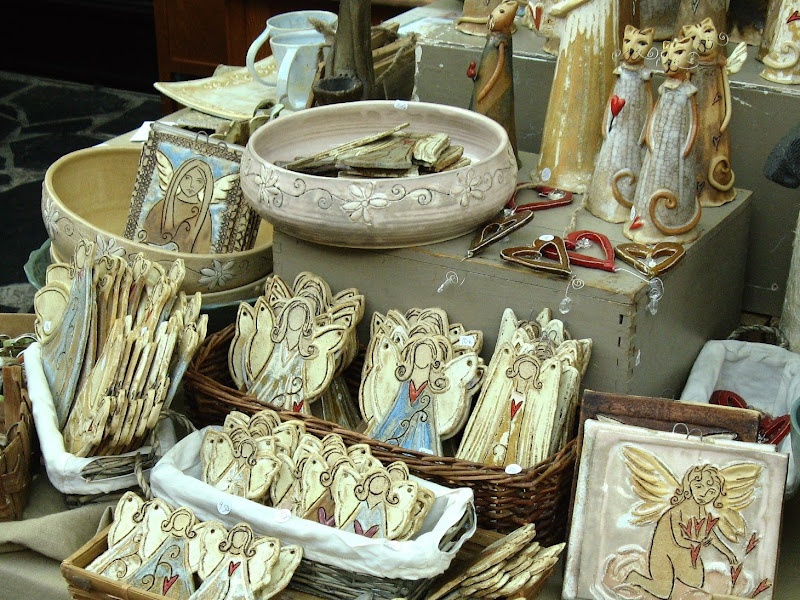
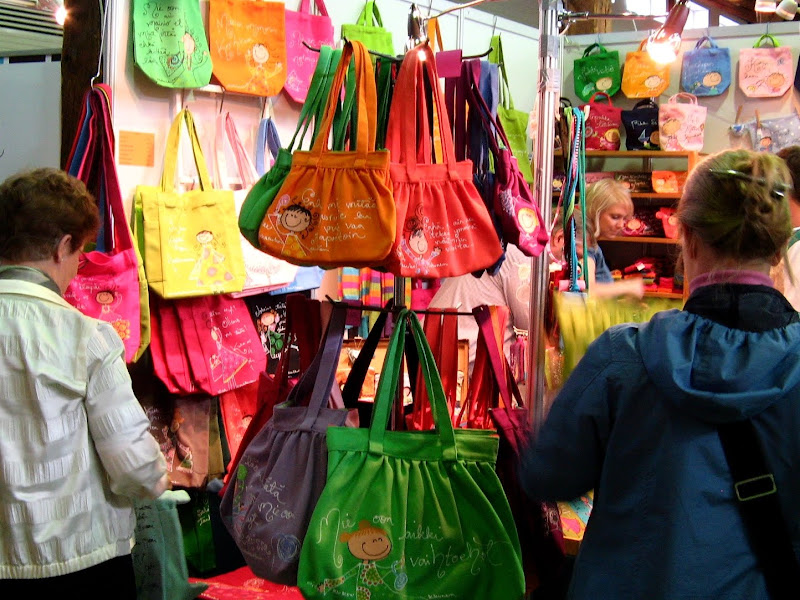
Made a day trip to Helsinki last Sunday to visit the craft fair Kädentaitomessut that took place in the lovely Wanha Satama (Old Harbour) fair centre.
There were many exhibitors, selling both crafts and supplies (yarn!), so couple of hours went by very quickly. Most of the handmade items were either sewn, felted, made of leather, wood, wire or ceramics. They were all very unique and kind of modern, not at all what can be seen at the craft fairs in my country - mostly traditional and folk culture based items. I saw some machine knitted knitwear, but actually no handknittings. Must be an unlucrative activity!
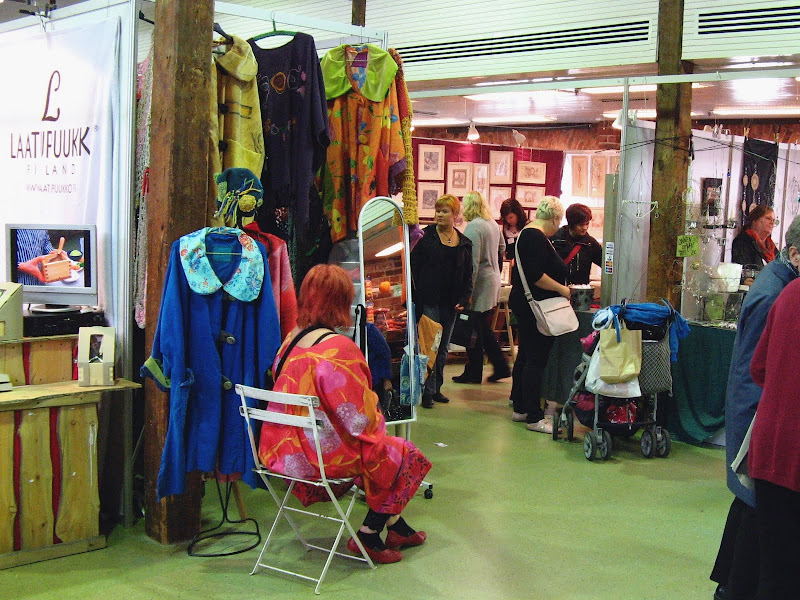


Other trip highlights:
* Helsinki Vintage fair that had brought together many people interested in vintage fashion and accessories. The most exceptional were the outfits and hair styles from the past, worn by some sellers and visitors.
* Lunch at the fishing harbour, consisting of a large portion of muikku (vendace) and September sun.
* My fair purchases: Addi bamboo needles, a blackberry Zauberball and Kalahari karakul wool made in Botswana(!):

There were many exhibitors, selling both crafts and supplies (yarn!), so couple of hours went by very quickly. Most of the handmade items were either sewn, felted, made of leather, wood, wire or ceramics. They were all very unique and kind of modern, not at all what can be seen at the craft fairs in my country - mostly traditional and folk culture based items. I saw some machine knitted knitwear, but actually no handknittings. Must be an unlucrative activity!
Other trip highlights:
* Helsinki Vintage fair that had brought together many people interested in vintage fashion and accessories. The most exceptional were the outfits and hair styles from the past, worn by some sellers and visitors.
* Lunch at the fishing harbour, consisting of a large portion of muikku (vendace) and September sun.
* My fair purchases: Addi bamboo needles, a blackberry Zauberball and Kalahari karakul wool made in Botswana(!):
Sunday 5 September 2010
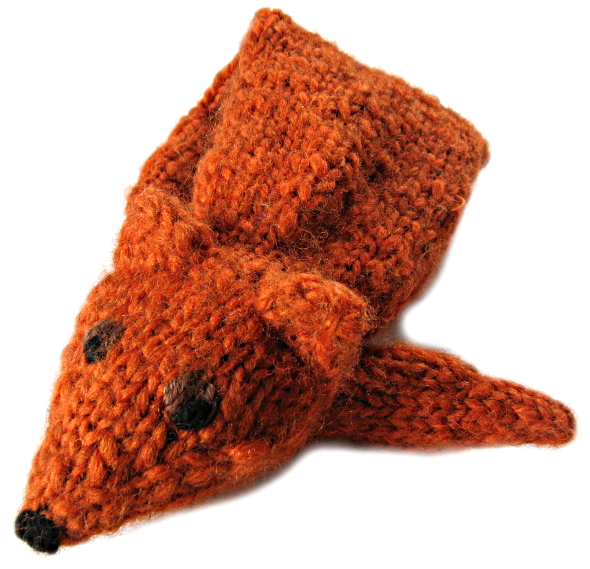
Kitchen blues
Something very practical - I needed a nice pot holder or oven mitt for my blue kitchen. I knitted a large mitten and felted it in the washing machine. Looks very warming and if the weather gets cold, there is always the possibility to knit another one and wear them outside (and a fish scarf as well?).
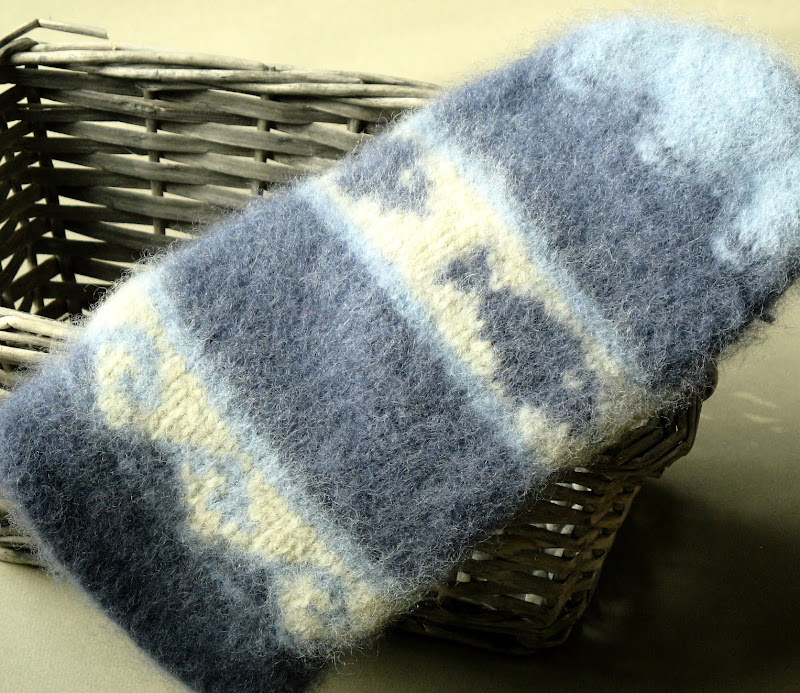
This is how the mitten looked like before felting, not so cute at all:

Have to put something good in the oven now - the official mitten testing meal.
This is how the mitten looked like before felting, not so cute at all:
Have to put something good in the oven now - the official mitten testing meal.
Friday 13 August 2010
Velvet around neck
Although the summer seems to be endless, I already have autumn colours on my mind. And materials. And past time treasures that captivate me more and more lately.
These choker necklaces are bead embroidered on velvet ribbon or fabric and have antiqued metal extension chains and clasps.

These choker necklaces are bead embroidered on velvet ribbon or fabric and have antiqued metal extension chains and clasps.
Sunday 1 August 2010
White with bronze
Antique bronze with white is a great colour combination. White can be too cold sometimes, but I like the way it adopts the warmer tone of bronze.
These are simple earrings made of woolwhite felted balls, seed beads and metal.

These are simple earrings made of woolwhite felted balls, seed beads and metal.
Sunday 25 July 2010
Iceland's longest scarf
There was an article in our newspaper about Fríða Gylfadóttir, an artist from Iceland, and her knitting project - a 17 kilometers long scarf! The scarf is going to reach from Siglufjörður to Ólafsfjörður, these towns will be connected by a long-awaited tunnel in autumn.
This seemed such a terrific idea, that I decided to make a small contribution, grabbed the needles right away and made a scarf piece like a lace stitch sampler. Unfortunately, the yarn ball allocated for this project was only enough for 160 cm, but I am going to send it to Iceland anyway.

Currently about 10 more kilometers need to be knit, so if you would like to help, the postal address can be found in Frida's blog. The scarf should be 20 cm wide to fit the project.
One of the sponsors of this project is Ístex yarn company, I already found their online shop and set my eyes on some beautiful Icelandic wool!
Update: the scarf was finished and the tunnel opened! Read the article in Iceland Review Online.
This seemed such a terrific idea, that I decided to make a small contribution, grabbed the needles right away and made a scarf piece like a lace stitch sampler. Unfortunately, the yarn ball allocated for this project was only enough for 160 cm, but I am going to send it to Iceland anyway.
Currently about 10 more kilometers need to be knit, so if you would like to help, the postal address can be found in Frida's blog. The scarf should be 20 cm wide to fit the project.
One of the sponsors of this project is Ístex yarn company, I already found their online shop and set my eyes on some beautiful Icelandic wool!
Update: the scarf was finished and the tunnel opened! Read the article in Iceland Review Online.
Thursday 22 July 2010
Diamond shawl
The project started in the previous post is accomplished now inspite of the inhumane weather conditions. It's a merino wool lace shawl with continuous diamonds and zig-zags.
The colour is very neutral greyish brown, wearable with almost anything. Usually I don't like to use stitch patterns with "sharp corners" with wool, but I was aiming for a shawl that would look more modern rather than too romantic. If lace can be unromantic at all, that is.
And to think of all the extra warmth captured in it...

If you would like to knit a similar shawl, why not try the Allegretto shawl pattern.
The colour is very neutral greyish brown, wearable with almost anything. Usually I don't like to use stitch patterns with "sharp corners" with wool, but I was aiming for a shawl that would look more modern rather than too romantic. If lace can be unromantic at all, that is.
And to think of all the extra warmth captured in it...
If you would like to knit a similar shawl, why not try the Allegretto shawl pattern.
Saturday 10 July 2010
Wool mess in a heatwave
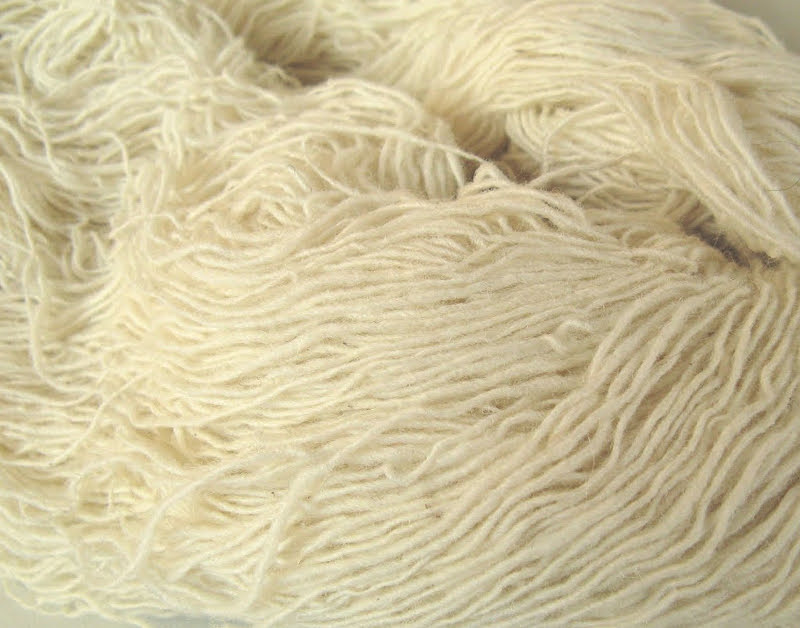
The hottest season reminds knitters that it is high time to take out the wool and start preparations for the autumn and winter time. Yippii! Wool and handknitting - what a natural harmony.
Coming down to earth I discovered that most of my lace yarns are in skeins and need winding to balls. My granny always said, never take the yarn ball through any loops or you'll be doing it for the rest of the skein, but I got it all so messed up and couldn't help myself... Luckily, the situation cleared up in the middle of the skein and I could enjoy a bit of quick easy winding.
And even managed to do some knitting tests - for a project that I started yesterday and according to my speed calculations could last until Christmas. Well, at least it would be easy to decide, which work to take along for instance, when evacuating from the city if the weather forecast for the next week will become true - temperatures above +30°C.
Tuesday 29 June 2010
Seaside bracelets
The weather has warmed up even here in the North and beach is the place where most people prefer to be.
I had some aqua blue glass chips, just the right colour for this summer, added some glass beads, moonstones and shells and all this was enough for three bracelets.
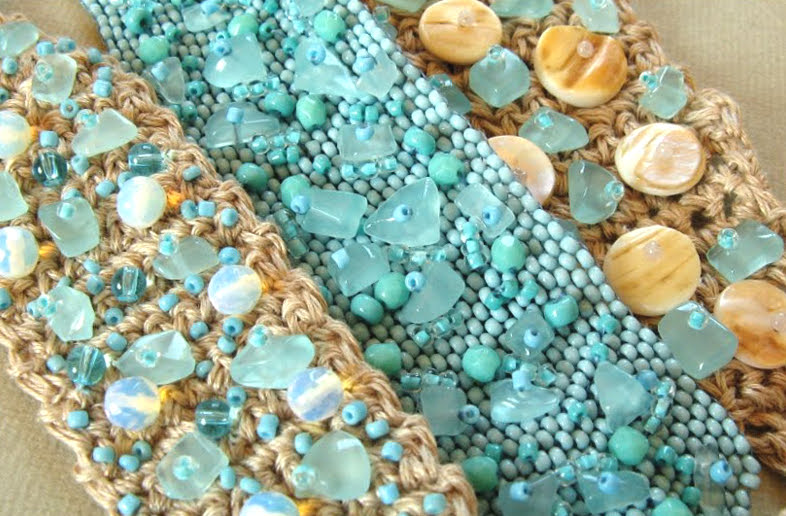
The bases of two bracelets are crocheted of cotton and linen yarn, the blue one is woven in peyote stitch.
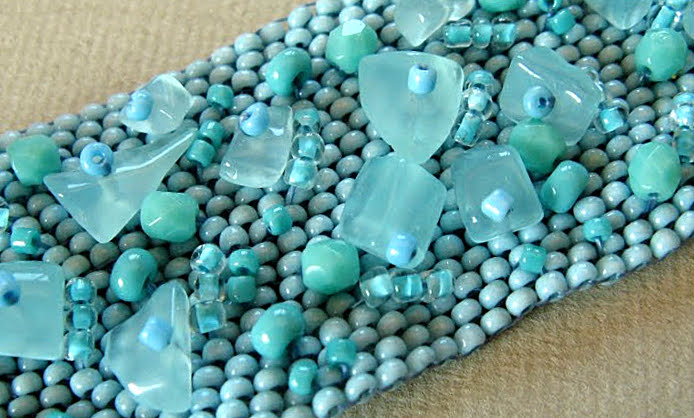
I had some aqua blue glass chips, just the right colour for this summer, added some glass beads, moonstones and shells and all this was enough for three bracelets.
The bases of two bracelets are crocheted of cotton and linen yarn, the blue one is woven in peyote stitch.
Monday 21 June 2010
A butterfly brought the summer
This bright turquoise yarn was calling out for a cheerful summer companion. Beads in water tones, as well as intriguing orange and purple, are knitted along with the yarn and cannot escape from the shrug.

Stringing the beads onto the yarn in the right order according to the "master plan" took a whole hour.

The stitch pattern is very simple, just some reaccurring double holes. The bamboo and cotton yarn feels really soft and light.

The butterfly can change itself according to the light direction and conditions.

Stringing the beads onto the yarn in the right order according to the "master plan" took a whole hour.
The stitch pattern is very simple, just some reaccurring double holes. The bamboo and cotton yarn feels really soft and light.
The butterfly can change itself according to the light direction and conditions.
Saturday 19 June 2010
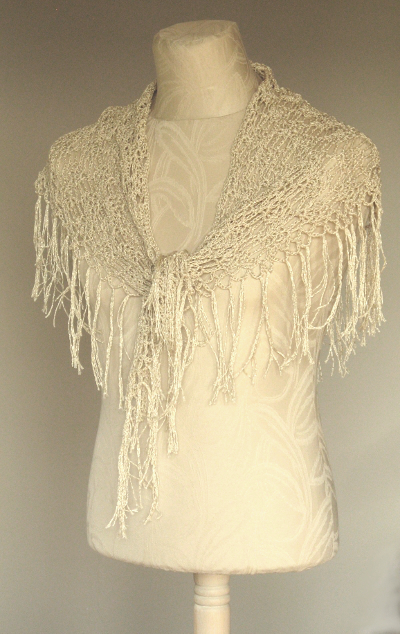
Cotton lace shrugs
Knitting with cotton is very different than knitting with wool. The yarn itself does not stretch at all, still the knitted piece can be very stretchy depending on the stitch pattern used.
I tried knitting a bit of cotton lace and made these two shrugs. Different yarn and colour shade, both 100 per cent cotton.
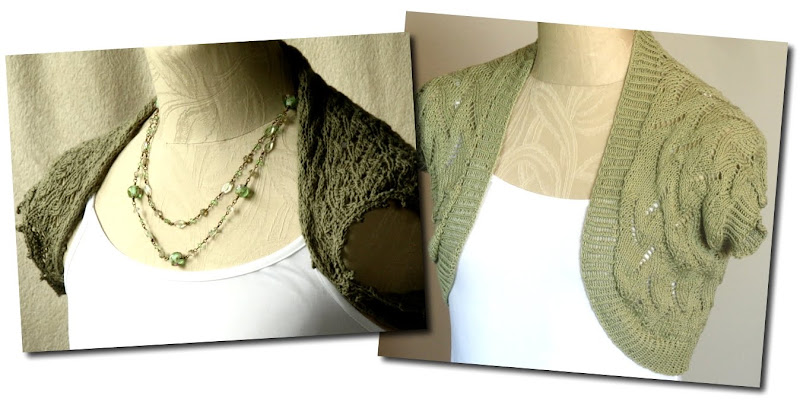
The left one is knitted using the easiest pattern of a simple rectangle, for the one on the right I made a paper pattern by cutting an old sweater. This one is knitted in one piece as well and side seams sewn together.

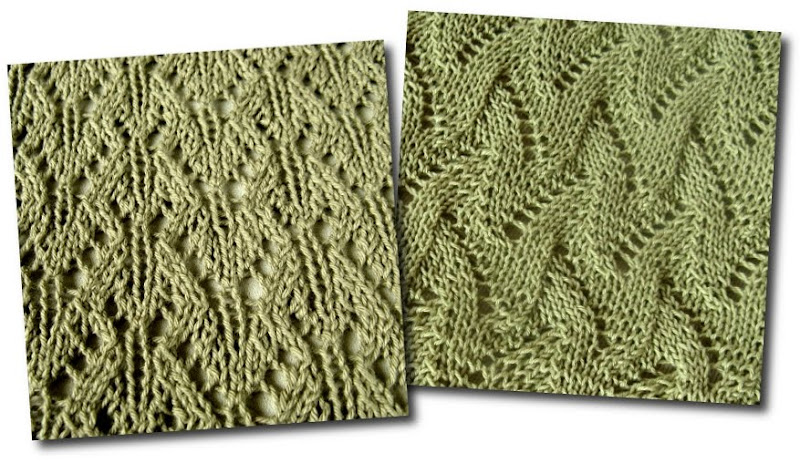
The close-up of the lace patterns:
I tried knitting a bit of cotton lace and made these two shrugs. Different yarn and colour shade, both 100 per cent cotton.
The left one is knitted using the easiest pattern of a simple rectangle, for the one on the right I made a paper pattern by cutting an old sweater. This one is knitted in one piece as well and side seams sewn together.
The close-up of the lace patterns:
Monday 24 May 2010
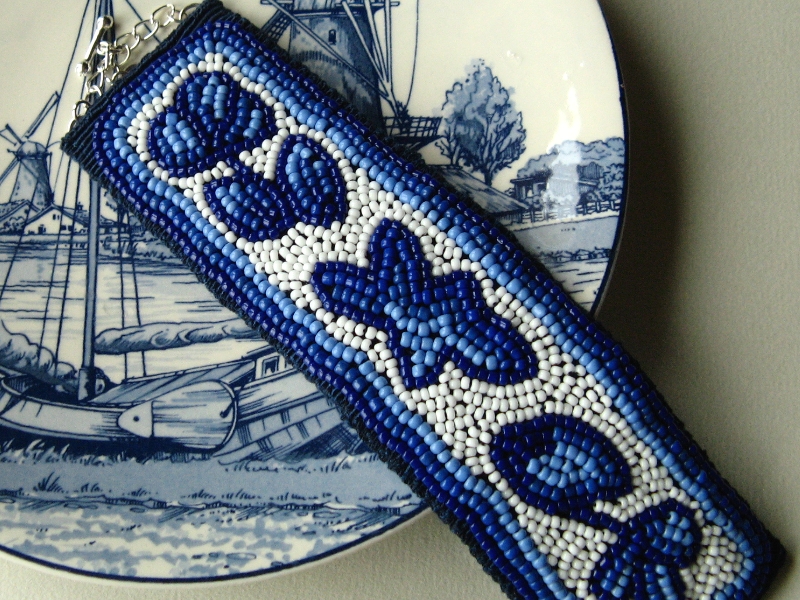
Delft blue bracelet
Blue and white porcelain inspired me to try these colours in bead embroidery and a bracelet seemed like the right amount of work to do.
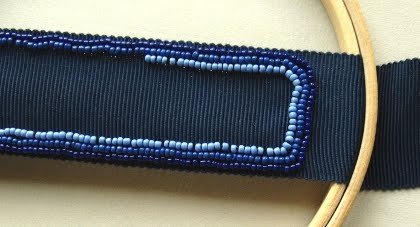
Materials all gathered: glass seed beads, a ribbon for the bracelet base, thread and an embroidery needle.

Made the frame first, starting with the darkest blue beads. Not sure if I like it this way...
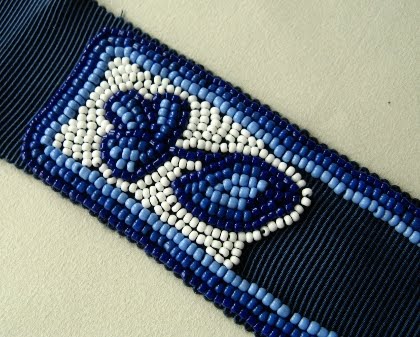
Finished the first flower! The frame looks all right now, I think. The overall image reminds me more of those Mediterranean blue and white tile mosaics than porcelain, actually.
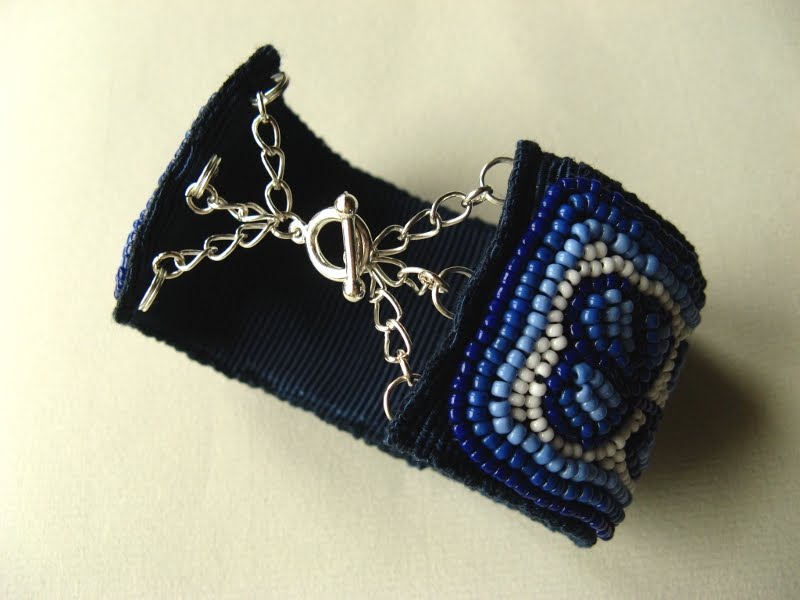
When finished embroidering, double folded the ribbon and sewed by hand all around the edges. The hardest part is making a clasp. Out of several options coming to my mind, I decided to sew some double rings to the back side where I could attach jump rings, pieces of extension chain and a toggle clasp.
Materials all gathered: glass seed beads, a ribbon for the bracelet base, thread and an embroidery needle.
Made the frame first, starting with the darkest blue beads. Not sure if I like it this way...
Finished the first flower! The frame looks all right now, I think. The overall image reminds me more of those Mediterranean blue and white tile mosaics than porcelain, actually.
When finished embroidering, double folded the ribbon and sewed by hand all around the edges. The hardest part is making a clasp. Out of several options coming to my mind, I decided to sew some double rings to the back side where I could attach jump rings, pieces of extension chain and a toggle clasp.
Sunday 23 May 2010
Jasper in plentiful company
This jasper pendant called out for some beads in the same mellow colours and seed beads in gentle pink and beige felt like the best way to imitate the stone's spots and stripes. In order to match the weight of this pendant, thousands of seed beads would be needed though, so I started making the strands until the necklace seemed balanced.
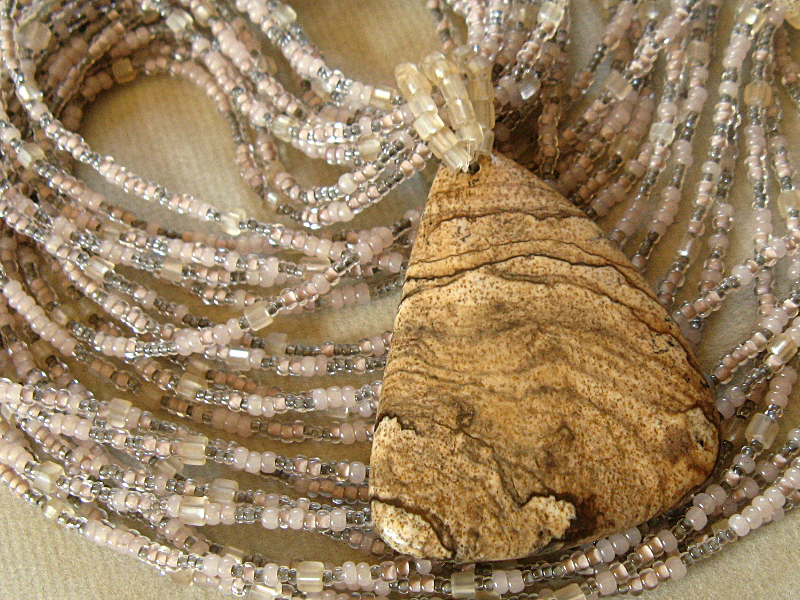
The necklace has ten seed bead strands, which are actually formed of five closed loops folded in double. The pendant and clasp are connected by three strands of the same cube seed beads that are adding some texture to the long strands.
A note for myself: never ever buy those tiny size 15/0 seed beads again, they are just impossible to work with (like beading with sugar!) and have to be strung straight to the cord without a needle. But they look so cute...
Tuesday 18 May 2010
Meet Mannie
Mannie came to me feeling somewhat tired and neglected. She was really happy to hear that I was looking for an assistant and eager to start working right away.
Mannie is my only helper at the moment, doing fitting and modelling, and hopefully will help out with some bookkeeping and supplies shopping as well in the future. (Haven't told her that yet, letting her enjoy the summer first.)
Mannie before and after the makeover:
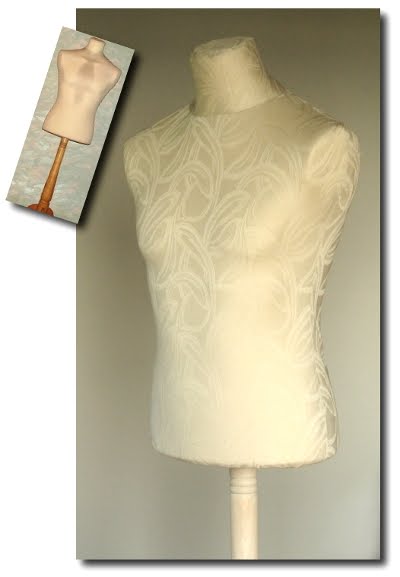
First thing, of course, was to make Mannie a new proper outfit.
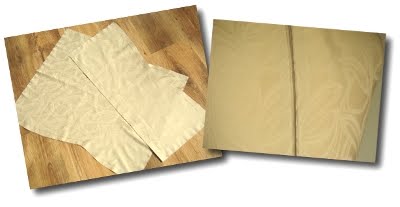
I needed to find a fabric that was stretchy, textured and of beautiful cream or beige colour. Not an easy task at all, but... accomplished - after going through ALL the fabric stores in the city in two days.
This fabric is probably a mixture of cotton and synthetics and not so stretchy as Mannie's old dress, so I had to make a cut in the back and add a zipper.
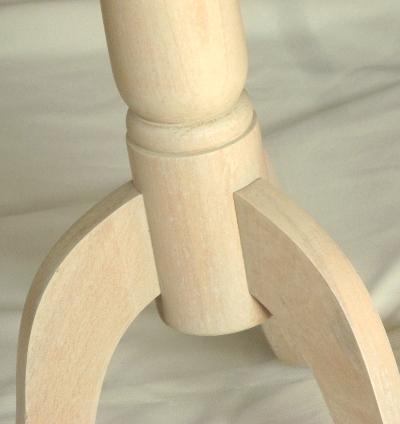
To give a matching finishing to Mannie's wooden leg, I painted it with water diluted wall paint in three coats. The outcome was really surprising, looking as if the wood had been sandpapered and lime painted and all...
Mannie is my only helper at the moment, doing fitting and modelling, and hopefully will help out with some bookkeeping and supplies shopping as well in the future. (Haven't told her that yet, letting her enjoy the summer first.)
Mannie before and after the makeover:
First thing, of course, was to make Mannie a new proper outfit.
I needed to find a fabric that was stretchy, textured and of beautiful cream or beige colour. Not an easy task at all, but... accomplished - after going through ALL the fabric stores in the city in two days.
This fabric is probably a mixture of cotton and synthetics and not so stretchy as Mannie's old dress, so I had to make a cut in the back and add a zipper.
To give a matching finishing to Mannie's wooden leg, I painted it with water diluted wall paint in three coats. The outcome was really surprising, looking as if the wood had been sandpapered and lime painted and all...
Subscribe to:
Posts (Atom)